Tutorials
Get started with OP3
Editing the Dependencies
OP3 supports dependencies out of the box. This feature helps you represent dependent tasks or milestones in a visually appealing way, with two different design configurations: Right Angled and Curved. These design configurations are applied to the entire project, in order for the dependencies to be uniformly represented in your project plan. You can easily configure the dependencies configuration in the Preferences section, where you can choose between the Right Angled or Curved design, as well as the desired dependency line color.
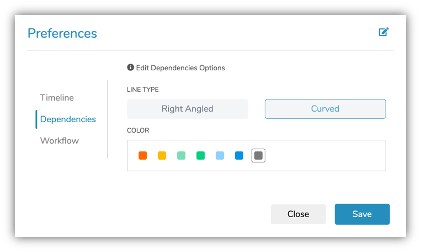
Dependencies Preferences
Creating Dependencies
On the board, you can introduce dependencies between items in a very convenient way. Since a dependency is a relation between two items, it’s logical to select the dependent item and specify its predecessor.
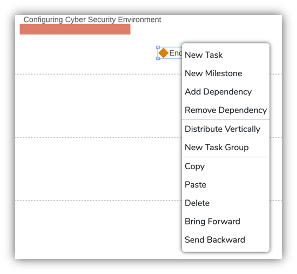
- 1. Right click on a task or milestone and choose ‘Add Dependency’ option. This would allow you to select a predecessor for that item.
- 2. Simply click on a task or milestone that you wish to select as a predecessor.
The dependency will only be added if the selected predecessor’s end date is before the start date of the current item. Otherwise, you will get an error message.
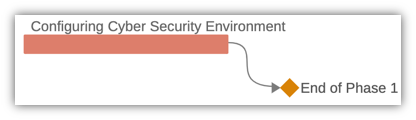
Based on the Project Preferences configuration, the newly drawn dependency will be either Right Angled or Curved. In the following illustration you can see a curved dependency, but you can easily change it, along with its color in the Preferences menu.
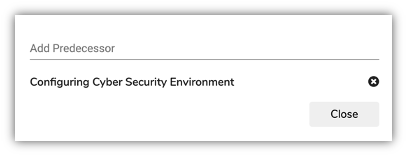
Another way to add a predecessor to an item is by selecting the item and opening the ‘Edit Dependencies’ menu located on the right hand pane. This menu will show the current predecessors of an item – there is no limit to the number of predecessors an item can have. In addition to that, it will allow you to select one of the available items that can be assigned as predecessors. This dialog automatically filters the items that are not viable predecessors for the selected items – their end date is further than the start date of the current item.
Removing Dependencies
The ‘Edit Dependencies’ dialog allows you to remove a dependency for the selected item, simply by clicking on the ‘x’ button for the desired dependency. But, if this method seems to take many steps to accomplish a simple removal of a dependency, there is a simpler method.
When you right click on an item, you have the option to remove a dependency. There are two main rules to keep in mind here:
- 1. If the selected item has only one predecessor, choosing ‘Remove Dependency’ option will remove that predecessor.
- 2. If the selected item has more than one predecessor, choosing ‘Remove Dependency’ option will bring up the Edit Dependencies dialog, where you can remove the desired predecessor.
For the following example, if you like to remove the predecessors of the milestone ‘End of Phase 1’, you will be redirected to the ‘Edit Dependencies’ dialog to remove the desired dependency.
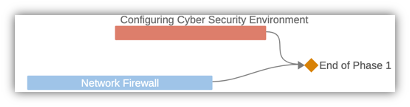
Final Note: Dependencies between items introduce moving bounds. The milestone ‘End of Phase 1’ cannot be placed before the end date of ‘Configuring Cyber Security Environment’. In the same way, the task ‘Network Firewall’ cannot be placed after the milestone.